

Category: Show me how

Roasted Red Bell Peppers
Smoky, tender roasted red bell peppers that make a great addition to salads, sandwiches and pasta dishes
The best part is they are very easy to make and a lot less expensive than buying the jarred versions in a store
You can roast peppers in many different ways such as right on the burner of your stovetop, on the grill or even in the oven on a sheet pan
We are going to show all three
No matter the method, the results will be the same
Delicious!
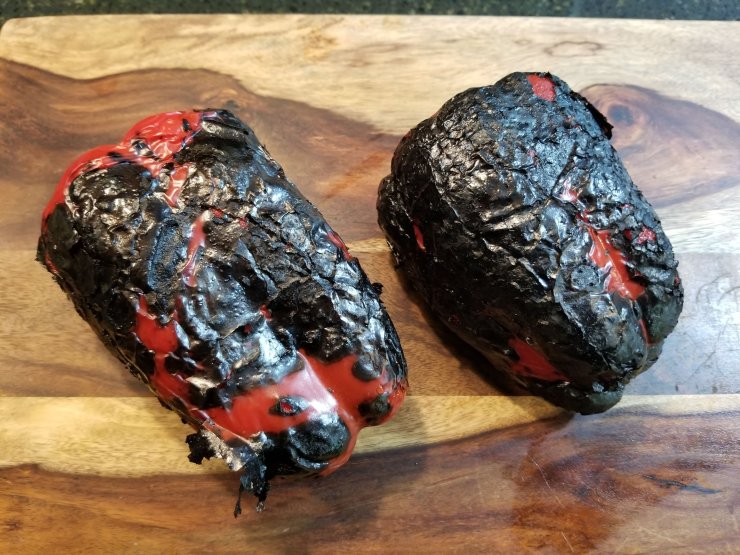
The first method is to simply place the peppers on a gas burner over medium heat
You want the flames just touching the skin

As the skin starts to blister turn the peppers using tongs

Repeat until all sides are blackened
Don’t be alarmed at the char as we will be removing the skin
This process is needed to give the pepper that roasted smoky flavor we are looking for

The only difference roasting on the grill is that the flames aren’t in direct contact with the pepper so this method takes a little more time
Place the peppers over direct high heat

Turn the peppers until you get the skin blistered

Now the oven method is slightly different
We are going to cut the pepper in half and removed the seeds and ribs
By cutting the pepper, we can blister all of the pepper at once
Line a sheet pan with foil and place the pepper halves cut side down on the foil

Place the peppers in a 450 F oven for 25-30 minutes or until the skin is nicely blistered

No matter what method you choose the next step is to place the peppers into a bowl while they are still hot

Cover the peppers with plastic wrap and let them stand at least 10 minutes

Why cover the peppers with plastic wrap and let stand?
The heat from the peppers will release as they cool but will be trapped in the bowl as steam
This steam will help loosen the skin from the flesh of the pepper
After the peppers have steamed for a bit remove them to a workstation
You can now start peeling the skin from the peppers using your fingers
A paper towel works well too


Perfect

Now that the skins has been removed let’s go ahead and cut the pepper in half

Remove the seeds and ribs and discard

Repeat with the other pepper

You can cut or slice these in any form depending on the application
We prefer larger slices for sandwiches, burgers etc. and thinner slices for salads, pasta or cheese and crackers
All that I can say is that any way you use these tasty roasted peppers, they will enhance your dish!

Enjoy!!!
Simply Sundays! ~ Roasted Red Bell Peppers
Ingredients
Red bell peppers
Directions
For stove top burners
Place the pepper on a gas burner over medium heat. You want the flames just touching the skin. As the skin starts to blister turn the peppers using tongs. Repeat until all sides are blackened. Don’t be alarmed at the char as we will be removing the skin. This process is needed to give the pepper that roasted smoky flavor we are looking for
For the grill
Place the peppers over direct high heat. Turn the peppers until you get the skin blistered
For the oven
Cut the pepper in half and removed the seeds and ribs. Line a sheet pan with foil and place the pepper halves cut side down on the foil. Place the peppers in a 450 F oven for 25-30 minutes or until the skin is nicely blistered
Next step regardless of cooking methods
Place the peppers while they are still hot into a bowl. Cover the peppers with plastic wrap and let them stand at least 10 minutes. This steam will help loosen the skin from the flesh of the pepper. After the peppers have steamed for a bit remove them to a workstation
Start peeling the skin from the peppers using your fingers. A paper towel works well too. Now that the skins has been removed cut the pepper in half. Remove the seeds and ribs and discard. Repeat with remaining pepper and slice for your desired serving
Tools used to make this recipe
ZELITE INFINITY Chef Knife 8 inch
Architec Carving Board, Gripperwood
© Simply Sundays 2020
All rights reserved

Show me how to Roast Garlic
Roasted Garlic adds a completely different layer of flavor to your dishes. Think warm, nutty & creamy
We keep a jar of this in our fridge at all times for use in pan sauces & pastas, tossed on pizza or even as a delicious spread on a baguette
I like to buy the pre-peeled garlic that many grocery stores sell by the ounce. I generally buy two 8 oz containers at a time – one to roast and one to use chopped, sliced or grated in recipes
But feel free to use whole heads of garlic that you peel the skins off of yourself
Start by pre-heating your oven to 375 degrees
Place the cloves from 4 heads of garlic, peeled, in an oven safe dish; sprinkle with about a teaspoon of black pepper, a teaspoon of kosher salt and about 2 tablespoons of olive oil

Cover tightly with foil

Place in oven for about 30 – 40 minutes until garlic becomes soft and golden brown

Store in a glass container with the olive oil from the pan in the fridge for up to 2 weeks
Perfect addition to our Roasted Garlic Mashed Potatoes! Try them out!

Enjoy!
Show me how to Roast Garlic
Ingredients
4 heads garlic
1 teaspoon black pepper
1 teaspoon of kosher salt
2 tablespoons of olive oil
Directions
Pre-heat oven to 375 degrees
Place the cloves from 4 heads of garlic, peeled, in an oven safe dish; sprinkle with 1 teaspoon of black pepper, a teaspoon of kosher salt and 2 tablespoons of olive oil
Cover tightly with foil & place in oven for about 30 – 40 minutes until garlic becomes soft and golden brown
Store in a glass container with the olive oil from the pan in the fridge for up to 2 weeks

Show me how to make Homemade Vanilla Extract
As a kid, I remember opening up our spice cabinet and getting a whiff of the unmistakably warm & fragrant smell of fresh vanilla beans
I am immediately transported back to my childhood when I make a batch of this inexpensive and flavorful Homemade Vanilla Extract
If you’ve ever bought a bottle of pure vanilla extract, you know how good it is, but how pricey it can be!
All you need is a dark glass (vanilla reacts to sunlight, so if clear is your only option, keep it in a dark place) , a couple of fresh vanilla beans, some good quality vodka and some patience

The jar I found was 4 ounces, but you could double the ingredients if you choose to use 8 ounces
All you need to do is slice the vanilla beans lengthwise to expose the bajillions of little black seeds
Smell it. It’s no wonder they make vanilla scented candles
Scrape the seeds out and put both the seeds and pods in the jar

Fill with good quality vodka and give it a shake
You can also use either bourbon or rum as the alcohol to make this extract, but I like that the vodka has no real taste of it’s own and the vanilla flavor takes center stage
Store the Homemade Vanilla Extract in a dark, cool place for 30 days, shaking periodically
It’s worth the wait, trust me
Now get baking! Or gifting! Who wouldn’t love a bottle of Homemade Vanilla Extract for the Holidays!

Enjoy!
Simply Sundays! ~ Homemade Vanilla Extract
Ingredients
2 fresh vanilla beans
4 oz good quality vodka
Directions
Slit open 2 fresh vanilla beans and scrape out seeds
Put in dark colored bottle with 4 oz. good quality vodka
Shake and store in a cool, dark place for 30 days, shaking occasionally
© Simply Sundays 2016
All rights reserved

Show me how to make basic pie dough and cheddar pie dough
I adapted this recipe from Martha Stewart
I always wanted to make a good pie crust but it seemed to allude me
Then I discovered this recipe and the glory that is a food processor and my life changed forever
Well…not really, but my pie making sure did!
This is just a great go to pie crust recipe that has not failed me yet!
For this recipe we will need 2 1/2 cups of flour, 1 teaspoon of salt, 2 sticks of cold butter and 1/4 cup of ice water

Add the flour and salt to a food processor
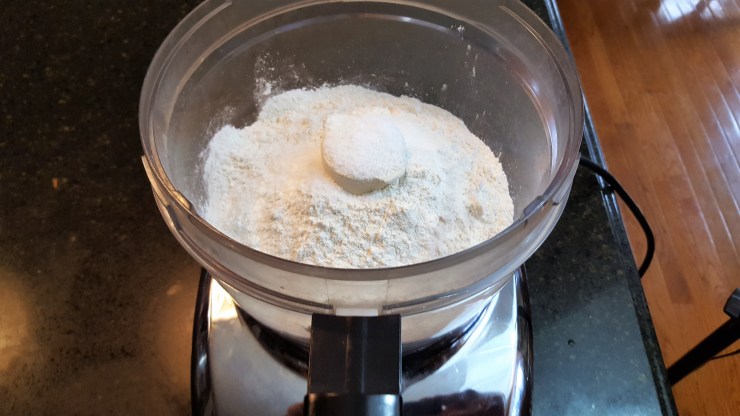
Pulse to combine

Cut the butter into chunks and add into the food processor


Pulse until the mixture resembles a course meal

Next you will need a 1/4 cup of ice water (you shouldn’t need all of it)
Add a little water at a time and pulse until mixture holds
The dough should not be wet or sticky
If you add too much water you may have to add some flour

")
At this point if all you want is a basic pie dough you can skip ahead to the rolling the dough into a ball
If your going for the cheddar crust simply shred a cup of sharp cheddar

Add to the cheese to the processor and pulse until just combined

Remove your dough and using your hands roll into as even a ball as you can

Cut the ball in half and flatten into 2 disks

Use right away or wrap in cling wrap and store in your refrigerator
If your storing it in the refrigerator let the dough come up to room temperature before rolling it out

Try our Rustic Apple Crostata with the cheddar pie crust!

Enjoy!!!
Simply Sundays! ~ Basic Pie Dough and Cheddar Pie Dough
Ingredients
2 1/2 cups of flour
1 teaspoon of salt
2 sticks of cold butter
1/4 cup of ice water
1 cup of sharp cheddar cheese (optional)
Directions
Add 2 1/2 cups of flour to a food processor. Next add 1 teaspoon of salt, then pulse to combine. Cut 2 cold sticks of butter into chunks and add to the processor. Pulse until the mixture resembles a course meal
Next we will need a 1/4 cup of ice water (you shouldn’t need all of it). Add a little water at a time and pulse until mixture holds. The dough should not be wet or sticky. If you add too much water you may have to add some flour
At this point if all you want is a basic pie dough you can skip ahead to the rolling the dough into a ball. If your going for the cheddar crust simply shred a cup of sharp cheddar. Add to the processor and pulse until just combined
Remove the dough and using your hands roll into as even a ball as you can. Cut the ball in half and flatten into 2 disks
Use right away or wrap in cling wrap and store in your refrigerator. If your storing it in the refrigerator let the dough come up to room temperature before rolling it out
Tools used to make this recipe
Architec Gripperwood Cutting Board
Cuisinart 14-Cup Food Processor
© Simply Sundays 2016
All rights reserved